The principles of (acid) etching, with illustrations
| VISIT US |
Bergdala glastekniska museum
|
|

|
||
|
För andra språk erbjuder vi/ for other languages we offer
- Acid etching
- (Sand) Blasting - Decals for decoration |
|
The principles of (acid) etching, with illustrations
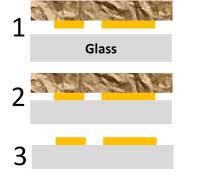
Line etchingLine etching is a four-step process : |
|
|
First the glass is covered with a very thin layer of a wax-oil mixture.
The layer must be very thin not to give flakes as the pattern was drawn and the recipes were kept secret. |

|
||
|
The pattern is drawn in the wax layer to expose the glass where the pattern shall be. The drawing can be done by hand or by machines.
The two types of machines used were the Guilloché machine for purely geometrical patterns, taking only one glass at a time,
and the pantograph. Pantographs could handle up to 36 glasses at the same time. Our pantograph can take 24.
|

|
||
|
The glass is then put in a bath of hydrofluoric acid. The acid attacks the glass but not the wax. This is the etching itself.
The glass is left in the bath until the lines have become a few tenths of a millimetre deep.
The glass is taken out of the acid and the wax layer is washed off. |

|
||
|
Since the pattern consists of etched lines in the glass itself it can never be removed or worn off like printed patterns or stoving decals can.
On the other hand it cannot be coloured.
|

|
||
|
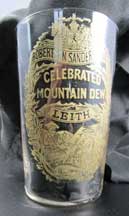
In the display we have sevaral line etched/deep etched/bright etched glasses.
|
|||
Matt etching for surfacesMatt etching for surface decoration can be done in different ways.Basically, just like for line etching, the glass is exposed to an acid which attacks the glass where the pattern is to be. Depending on the acid one can choose to produce a matt or a blank pattern. For line etching the glasses are submerged in a liquid acid but for surface etching an acid gel, an etching paste, was used. This paste could be painted on to the glass or applied by a rubber stamp. The latter techniques was used at Pukeberg during the 1880’s. The recipe for the gel was a well-kept secret. The paste should be thick enough to stick to the rubber stamp but should then adhere to the glass surface. The alternative technique was more labourious. Possibly both techniques were called "transfer etching", at least at some glassworks. |
|||
|
The desired pattern, in a one-to-one scale, is engraved in a metal plate. The pattern to be etched is represented by the ridges
in the plate. The master plate, slightly warmed is covered with wax so that the depressions are filled.
It is important that no wax remains on the ridges.
|

|
||
|
A porous paper is put on the plate and softly tapped so that the wax sticks to the paper when lifted.
|

|
||
|
The paper is removed from the master and used to transfer the wax pattern to the glass surface.
|

|
||
|
The etching gel can then only attack the glass in those places where the original pattern had its ridges. You will find this glass – together with its master – in the display. Nowadays matt surfaceas are created using (sand)blasting. |

|
||